Which Way Do You Wrap PTFE Tape? Direction Explained
Which Way Do You Wrap PTFE Tape? Direction Explained
Direct answer
For a conventional right-hand pipe thread, wrap PTFE tape clockwise while looking directly at the open end of the male fitting. For a confirmed left-hand thread, wrap counterclockwise from the same viewpoint. Keep the opening clear and follow the product instructions. A thread’s country of origin or metric designation alone does not establish its handedness.
 | By Liu Yingbao Engineer · 20 years experience in PTFE line |
The most common source of confusion is the viewing angle. “Clockwise” becomes ambiguous if one person faces the opening while another looks along the pipe from behind. Fix the viewpoint before applying the rule.
For the complete process, use the step-by-step guide to applying PTFE tape. This article focuses on direction and how to avoid misreading it.
1. PTFE Tape Direction: Start with One Defined View
Hold the male fitting so its open, threaded end faces you. Imagine a clock face over the opening. For a right-hand thread, carry the tape around the outside in the clockwise direction from that view.
This describes the circumferential wrapping direction. It does not specify overlap, tape width or how far to progress along the threaded length; those are separate parts of the installation procedure.
| Item being described | Required reference | Practical meaning |
|---|---|---|
| Clockwise wrapping | Facing the open end of the male fitting | Normal direction for a right-hand thread |
| Counterclockwise wrapping | The same end-on view | Direction for a confirmed left-hand thread |
| Looking from behind the fitting | Opposite viewpoint | Apparent clockwise/counterclockwise sense reverses |
| Watching the female nut turn | A different moving component | Can create confusion; return to the defined male-end view |
The viewpoint is part of the instruction, not a minor detail.
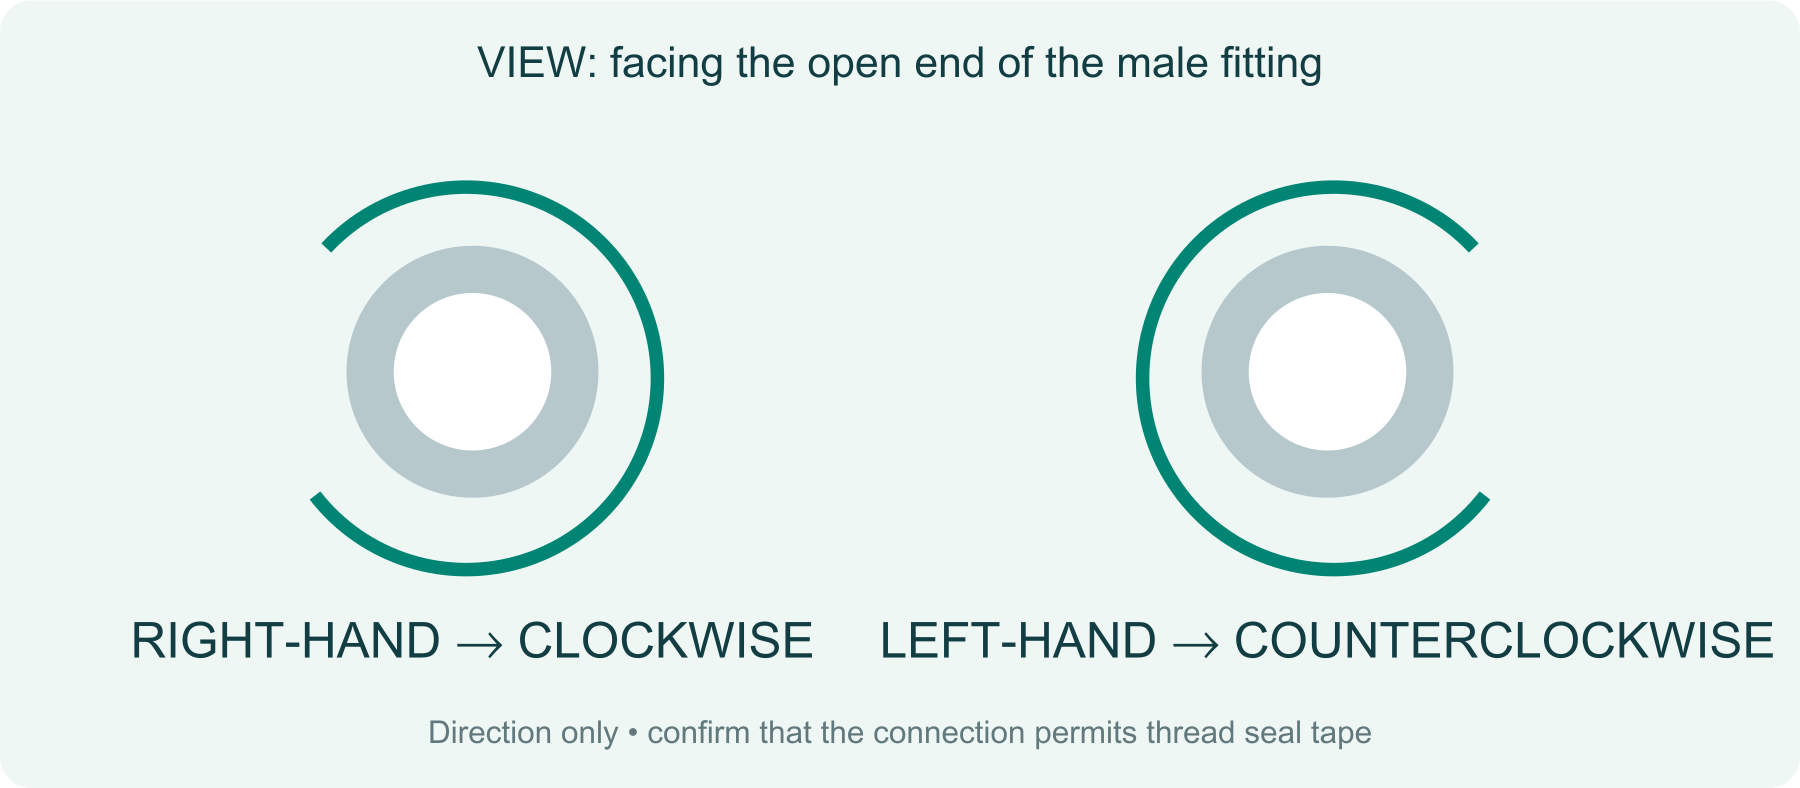
End-on conceptual direction guide, not a thread drawing. The reverse viewpoint reverses the apparent rotation.
2. Why Wrapping Direction Matters During Assembly
As mating threads engage, they slide against the applied tape. Correct wrapping helps the strip remain laid against the thread profile rather than encouraging its free edge to lift and bunch.
Direction alone does not create a seal. A correctly oriented wrap can still fail if the wrong joint is taped, the components are damaged, or the amount and tension are unsuitable.
Use ForeverSeal Aqua PTFE thread seal tape for water lines only within the confirmed product and connection requirements. Do not treat spool color as a direction guide or an approval.
Clockwise Is Not an Instruction to Tighten Harder
Wrapping direction and assembly torque are different issues. PTFE affects friction, so the fitting manufacturer's tightening method remains essential. More turning effort is not a substitute for checking thread compatibility.
3. Right-Hand vs Left-Hand Threads: How to Confirm
A conventional right-hand thread tightens with clockwise rotation when the rotating part is viewed from its turning end. A left-hand thread reverses that relationship. Because the visible part and viewing end can change, use drawings, markings or the manufacturer's specification for identification.
Do not force a fitting to determine its hand. Labels such as NPT, BSP or metric identify aspects of the thread system; they should not replace confirmation of handedness in an unfamiliar assembly.
| Thread identification | Wrap direction from the male open-end view | Action before assembly |
|---|---|---|
| Confirmed right-hand | Clockwise | Check that thread sealing tape is permitted |
| Confirmed left-hand | Counterclockwise | Follow the specific connection instructions |
| Unknown handedness | Do not guess | Obtain the component specification |
| Washer, flare or compression seal | Direction rule may be irrelevant | Locate the actual sealing interface first |
Special Gas Connections Need Separate Attention
Some fuel-gas equipment uses left-hand connections, but that does not mean tape belongs on them. Cylinder outlets, regulators and hose connections may seal at dedicated surfaces rather than threads. Follow the component instructions; do not transfer a pipe-thread technique to every threaded gas connection.
For suitable downstream fuel-gas pipe joints, review ForeverSeal GasSafe gas-rated PTFE thread seal tape. Fuel-gas documentation is not oxygen compatibility evidence.
4. Which Way to Wrap Plumbers Tape: A Practical Sequence
Set the viewpoint and anchor the first turn
After cleaning and inspecting the threads, face the male opening and confirm the thread hand. Position the tape behind the leading thread as required, keeping it out of the bore. Hold the starting edge while establishing the first turn.
Maintain tension and the prescribed overlap
Move around the outside in the identified direction. Keep the strip against the profile without pulling it into a narrow cord or shredding it. The spool's position is secondary; the direction in which tape is laid on the fitting is what matters.
Finish neatly and check engagement
Complete the product-specified amount, finish the tail and smooth the tape. Engage the mating part carefully. If material piles up or the joint resists abnormally, stop and inspect. Do not continue tightening merely to hide a poor wrap.
If you are unsure, remove the tape and begin again. An unused damaged wrap is easier to correct than an assembled leaking joint.
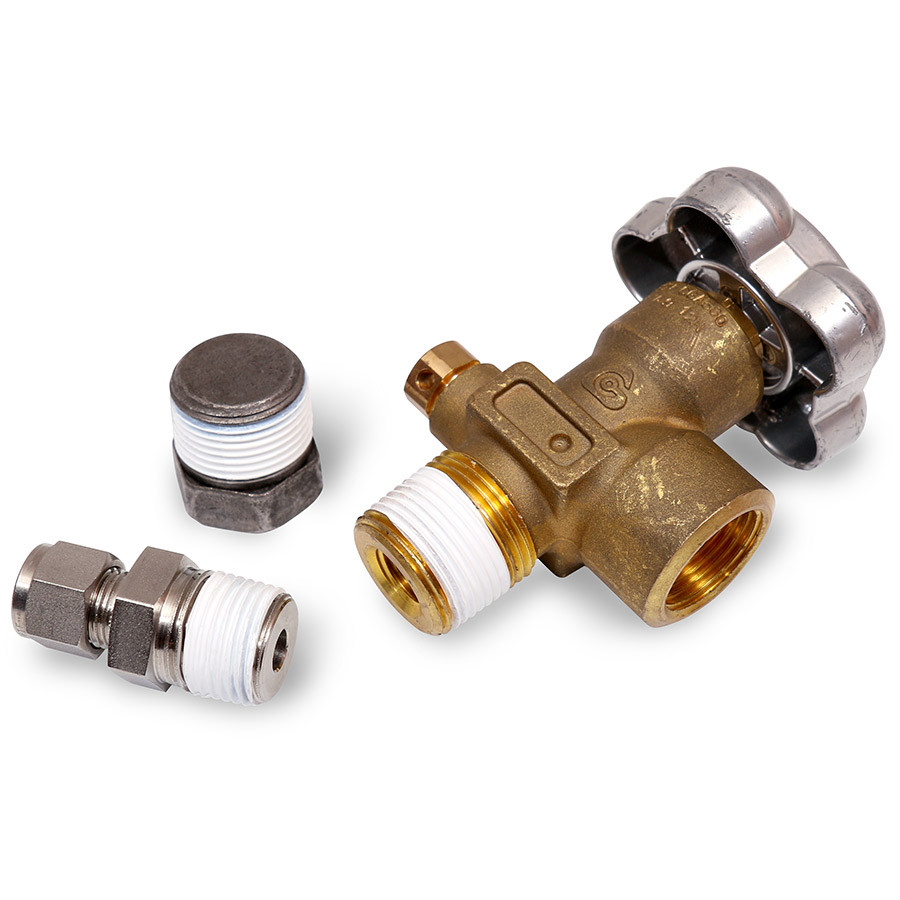
Application examples from the supplied image library. Confirm each fitting’s actual sealing interface before applying tape.
5. How Direction Relates to Wrap Count and Tape Specifications
ForeverSeal's Aqua and Industrial TDS instruct wrapping in the direction of thread rotation and specify a minimum of three wraps for those products. This is not a universal rule for every density, width, fitting or service.
Consider two nominal specifications from the supplied TDS:
| Example | Thickness | Density | Calculated mass per area |
|---|---|---|---|
| Aqua AQ-W12-T10-D4 | 0.10 mm | 0.4 g/cm³ | 40 g/m² |
| Industrial ID-W12-T10-D10 | 0.10 mm | 1.0 g/cm³ | 100 g/m² |
Calculation: density in g/cm³ × thickness in mm × 1,000 = g/m². These manufacturer-specification examples are not a wrap-count conversion or a sealing-performance comparison. They illustrate why “three turns” does not describe an identical material quantity for all tapes.
Use the ForeverSeal sealing calculator for planning guidance, then follow the exact product and component instructions. Changing direction cannot compensate for the wrong amount of tape.
6. Troubleshooting Tape That Unwinds or Bunches
| Symptom | What to investigate | Next step |
|---|---|---|
| Starting edge lifts | Direction, first-turn anchoring or loose tension | Remove and rewrap after checking the viewpoint |
| Material piles ahead of the female thread | Excess tape, direction or poor engagement | Stop and inspect both threads |
| Tape tears repeatedly | Excess tension, burrs or unsuitable strip | Inspect the component and product selection |
| Joint turns unusually easily or leaks | Wrong joint type, damage or assembly issue | Reassess the complete connection |
These observations suggest checks; they do not prove a single cause. Complete the system's required inspection and testing before service. Do not test for gas leaks with a flame.
7. Related PTFE Tape Guides
8. Choose the Tape After Confirming the Connection
The correct direction is only one part of a reliable installation. Send ForeverSeal the thread specification, fitting material, fluid, size and operating conditions so the product and documentation can be considered together.
9. Frequently Asked Questions
Which way to wrap plumbers tape on a normal water-pipe thread?
For a confirmed right-hand thread, clockwise when looking directly at the male opening. First confirm that the connection seals at the threads.
Does plumbers tape direction change for gas fittings?
The relevant variables are thread hand and viewing direction, not the gas alone. Product suitability and the connection's sealing design must also be checked.
Is counterclockwise wrapping always wrong?
No. It is the appropriate direction for a confirmed left-hand thread from the defined male-end viewpoint. It can also appear counterclockwise when a right-hand fitting is viewed from the opposite end.
Can I fix a backward wrap by adding another layer?
Remove the tape and reapply it correctly. Adding layers leaves the original wrap uncontrolled and can overload the thread clearance.
Can I loosen the assembled fitting to align it?
Follow the fitting manufacturer's rules. Do not assume that a backed-off connection remains sealed; reassembly and testing may be required.