How to Use PTFE Tape: A Step-by-Step Thread Sealing Guide
How to Use PTFE Tape: A Step-by-Step Thread Sealing Guide
Direct answer
Choose PTFE tape width to suit the fitting size and usable thread length, then select the product for the medium, thickness and density. Wrap in the tightening direction with controlled tension and overlap. The required turns depend on the complete combination of joint, tape and technique; a fixed count based only on pipe size is not a reliable installation rule.
 | By Liu Yingbao Engineer · 20 years experience in PTFE line |
Knowing how to use plumbers tape starts with identifying the seal location. A threaded nut may only clamp a separate sealing element; it does not automatically need tape. Explore ForeverSeal PTFE thread seal tape for application-specific options.
1. Before You Start: Confirm the Connection Needs Tape
Use pipe thread tape only where the component instructions permit it. Identify thread form, material and size, then check the tape against the fluid and operating conditions.
| Connection | Where the seal is made | Tape decision |
|---|---|---|
| Suitable tapered pipe thread | At the mating threads | Apply to male threads when specified |
| Flare fitting | At mating flare surfaces | Do not tape the flare seat |
| Compression fitting | At the ferrule or compression element | Do not add tape to the nut threads unless instructed |
| Washer or O-ring joint | At a separate sealing element | Tape does not replace the seal |
| Plastic threaded joint | Depends on the fitting design | Confirm permitted sealant and tightening method |
Do not use ordinary tape as an improvised treatment for cylinder valve outlets or regulator connections. Those interfaces require their own specified sealing method.
2. First Choose PTFE Tape Width for the Pipe Connection
Nominal pipe size helps organize selection, but it is not the measured outside diameter, bore diameter or required tape width. Confirm the thread standard and the usable threaded length before choosing a roll. A tape width should let the installer cover the intended sealing zone while keeping the opening clear.
| Common nominal reference | Inch designation | Width-selection starting point |
|---|---|---|
| DN6 / DN8 / DN10 | 1/8 / 1/4 / 3/8 in. | Inspect the short threaded zone carefully; 12 mm may be too wide for some instrument fittings. Use the component-specified narrower format where necessary. |
| DN15 / DN20 / DN25 | 1/2 / 3/4 / 1 in. | Evaluate 12 mm against the actual threaded length; consider 19 mm only where the permitted coverage requires it. |
| DN32 | 1-1/4 in. | Evaluate 12–19 mm with the chosen overlap and connection instructions. |
| DN40 / DN50 | 1-1/2 / 2 in. | Evaluate 19–25 mm where the sealing zone permits; 1-1/2 in. is also within the 1/2-in.-wide tape guidance in the cited ForeverSeal TDS. |
The nominal references are common designations, not a conversion between millimetres and measured thread diameters. The width suggestions summarize the supplied ForeverSeal selection note for initial evaluation; they are not a universal dimensional standard or a validated installation recipe.
Reconcile the Selection Note with the Product TDS
The supplied Aqua and Industrial TDS direct users to 1/2-in. tape for threads up to 1-1/2 in., and 3/4-in. or 1-in. tape for larger threads. Their listed metric product widths are 12, 19 and 25 mm. These are commercial format references, not exact unit conversions: 1/2 in. is 12.7 mm.
The internal note suggests wider tape earlier for some connections. That difference means width cannot be assigned by DN alone. For a specific order, agree on the actual width, thread coverage and installation method with the fitting and tape suppliers. Do not stretch a wide strip into a narrow cord merely to fit a small joint.
3. Then Choose Tape Type, Thickness and Density
Start with the medium and required documentation. Water-service tape, fuel-gas tape, oxygen-service tape and industrial tape are application categories, not merely different colors or densities. Review ForeverSeal Aqua PTFE tape for plumbing for water applications and ForeverSeal GasSafe gas-rated PTFE tape for suitable fuel-gas pipe joints.
| Variable | What changes | What must not be inferred |
|---|---|---|
| Width | Axial coverage and overlap needed | Tape width must equal nominal pipe diameter |
| Thickness | Initial strip thickness and local build-up | Twice the thickness always means half the turns |
| Density | Material mass per unit volume and handling behavior | Higher density automatically gives a higher pressure rating |
| Thread size and form | Circumference, pitch, engagement and geometry | Every larger thread has a proportionally larger clearance |
| Product type | Intended medium and supporting evidence | A density range alone proves gas or oxygen suitability |
A larger diameter does not itself mean higher system pressure. Thread clearance depends on the applicable standard, tolerances, condition and engagement. Do not compensate for damage or a mismatch by choosing thicker tape.
A Numeric Comparison: Thickness and Density Are Separate
For a uniform strip, mass per area = density (g/cm³) × thickness (mm) × 1,000.
| Illustration | Density | Thickness | Calculated mass per area |
|---|---|---|---|
| A | 0.4 g/cm³ | 0.10 mm | 40 g/m² |
| B | 0.8 g/cm³ | 0.10 mm | 80 g/m² |
| C | 0.4 g/cm³ | 0.20 mm | 80 g/m² |
These are arithmetic examples, not product recommendations. B and C have the same calculated mass per area but different structure and thickness; they cannot be assigned the same wrap count without evaluation. More material is not proof of proportionally better sealing.
4. Preparation: Tape, Threads and Tools
Isolate the system, relieve pressure and make the equipment safe before disassembly. Remove old tape and debris without damaging thread surfaces. Inspect for cracks, cross-threading, corrosion and incompatible thread forms.
Have the correct tape, suitable cleaning materials, and the specified assembly tools available. Keep internal passages free of loose material. For water piping, review ForeverSeal Aqua PTFE tape for plumbing.
Match the Product to the Medium
White or yellow packaging is not proof of service suitability. Fuel gas, oxygen and drinking water require different supporting evidence. A manufacturer's broad material temperature range is not a complete joint rating.
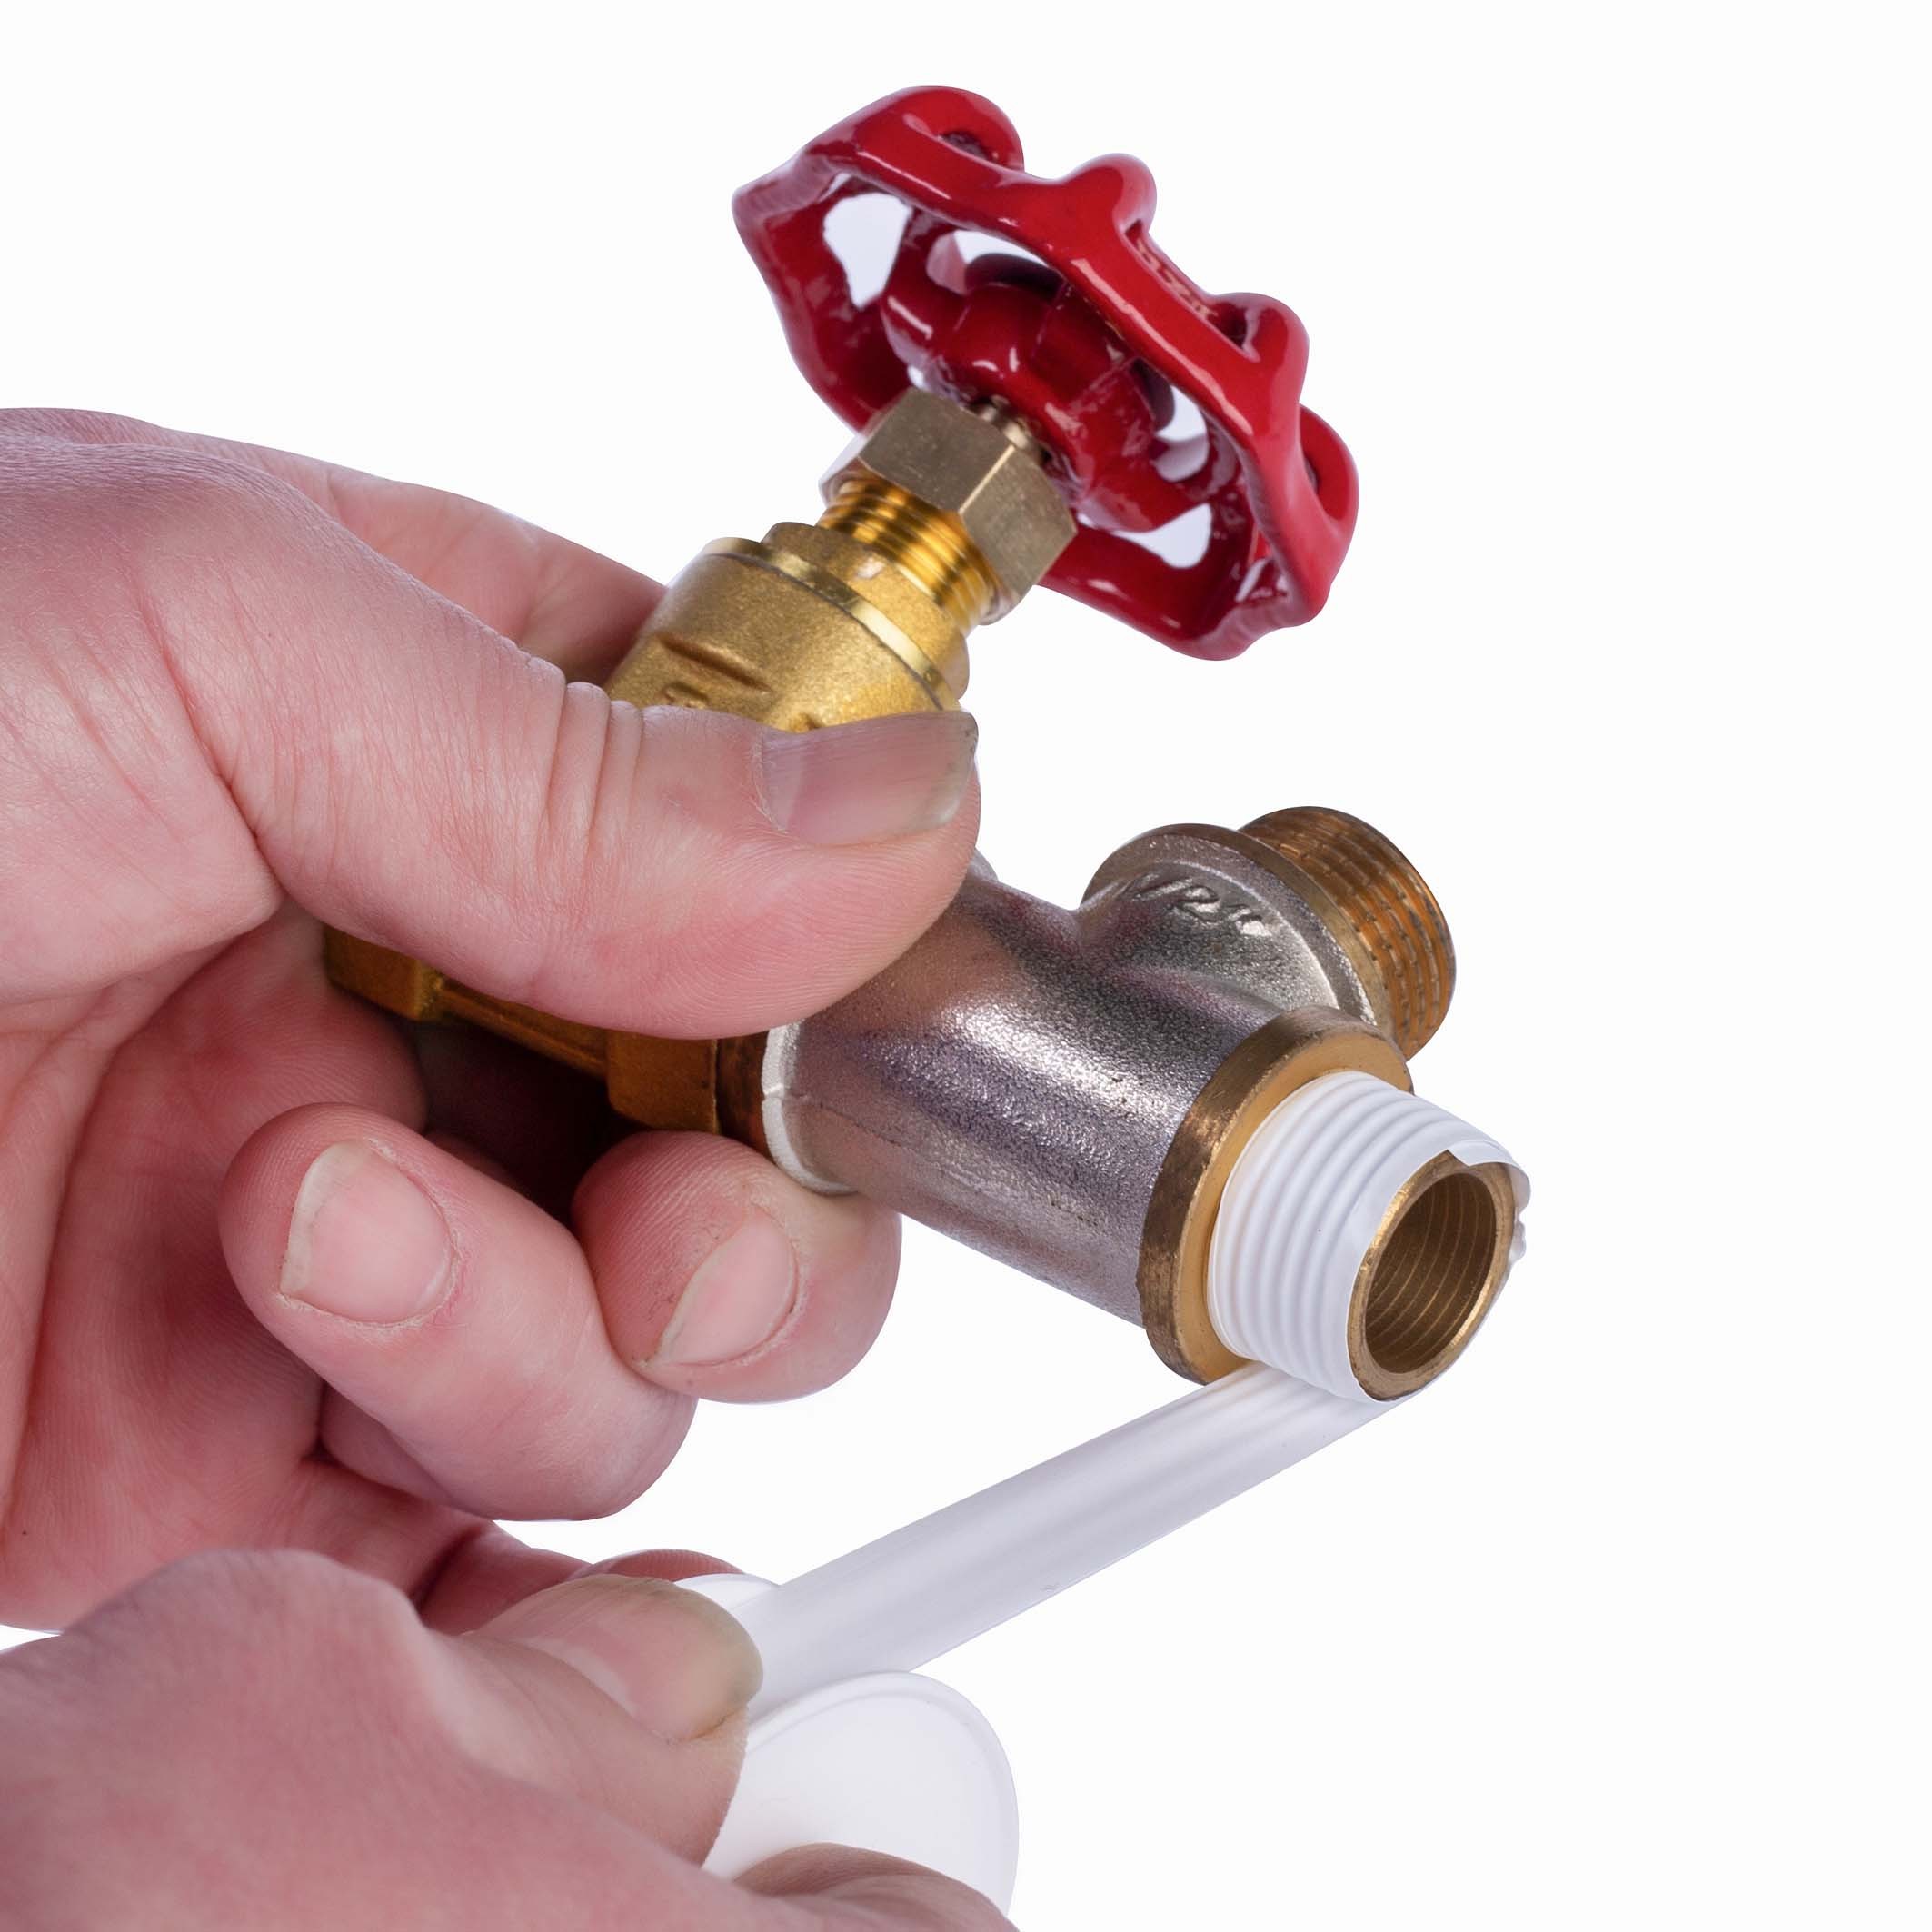
Applying PTFE tape to external fitting threads. Keep the bore clear and follow the tape and fitting manufacturers’ instructions for direction, tension and wrap count.
5. How to Use PTFE Thread Tape: Eight Installation Steps
1. Identify the sealing interface
Confirm that sealant belongs on the threads. Read the component instructions before wrapping.
2. Clean and inspect both parts
Remove old material from the male and female threads. Replace damaged parts; extra tape cannot correct a mechanical defect.
3. Establish the viewing direction
Look directly at the open end of the male threaded fitting. For a conventional right-hand thread, the wrapping direction is clockwise from this view. Confirm unusual threads rather than assuming.
4. Start behind the leading thread
Keep the end of the tape back from the opening as specified. Do not bridge the bore or leave a loose flap where it could enter the system.
5. Wrap with controlled tension
Lay the tape into the thread profile without shredding it. Follow the prescribed overlap. Avoid pulling so aggressively that the strip narrows excessively or breaks.
6. Apply the specified amount
Count complete turns and follow the instructions for the exact product and fitting. Finish neatly and smooth the tape into the profile.
7. Assemble without cross-threading
Engage the threads carefully and use the fitting manufacturer's tightening procedure. Tape reduces friction; a lower turning effort does not justify extra torque. If alignment requires backing off, follow the component's instructions rather than assuming the seal remains intact.
8. Inspect and test
Use the system's required commissioning procedure. Do not place the connection in service simply because it looks neat or because tape has no curing time.
6. How Many Wraps? Control the Joint, Tape and Technique Together
There is no reliable wrap-count chart based on pipe diameter alone. The supplied internal note gives 3–5, 5–7 and 7–10 turns for increasing size groups, but it does not tie those ranges to a complete set of thread tolerances, tape specifications and validated tests. They are workshop starting points for controlled evaluation, not installation instructions for every joint.
The current Aqua and Industrial TDS state a minimum of three wraps for those products. Keep that statement within the full product procedure. It does not define a universal final count or justify continuing to add material until a fitting becomes difficult to turn. Where documents differ, obtain a confirmed procedure for the exact combination before installation.
A Turn Is Not the Same as a Layer
One turn is one revolution around the fitting. Local layer count depends on whether turns stack on the same band or progress along the threads with overlap. Two workers can count the same turns yet leave different coverage and local build-up.
If an approved procedure specifies overlap as a percentage of strip width, define it explicitly. For example, 50% overlap on a 12 mm strip gives 6 mm axial advance per revolution, while 70% overlap gives 3.6 mm, assuming unchanged width and a uniform helical pattern. These calculations explain coverage; they are not recommended overlap settings or a sealing model.
Operator Technique Changes the Applied Result
| Operator variable | Effect to control | Workshop practice |
|---|---|---|
| Pulling tension | Excess stretching changes width and thickness; insufficient tension leaves a loose wrap | Demonstrate and standardize the accepted method |
| Overlap and travel | Changes coverage and local layer count | Define the overlap and start/finish zone |
| Count convention | Turns may be counted differently from completed passes | Record full revolutions and the wrapping pattern |
| Start and finish position | Affects bore clearance and loose tails | Keep the opening clear and secure the finish |
| Assembly method | Friction, engagement and loading interact | Use the fitting procedure; record the test result |
For repeated production work, qualify a combination of fitting specification + tape SKU + wrapping method + assembly method + acceptance test. Keep these inputs consistent between operators. Recheck the procedure when tape thickness, density, width or fitting source changes.
The ForeverSeal thread tape calculator can support planning, but it does not replace a qualified installation procedure or the fitting manufacturer's limits.
7. Common Mistakes and What to Check
| Observation | Possible cause | Appropriate response |
|---|---|---|
| Tape bunches during engagement | Wrong direction, loose wrapping or excess material | Disassemble safely, remove tape and reassess |
| Tape extends into the bore | Start position or width unsuitable | Rewrap with the opening clear |
| Unusual resistance immediately | Cross-threading, mismatch or excess tape | Stop; inspect rather than force the connection |
| Joint still leaks | Damage, wrong seal location, selection or assembly issue | Diagnose the joint; do not wrap tape around its exterior |
There is no reliable visual-only test for a pressure seal. A neat wrap is preparation, not proof.
8. How to Check and Test the Completed Joint
Follow the equipment and applicable installation requirements for test medium, pressure, duration and acceptance criteria. There is no single test pressure appropriate for every water, air or gas connection.
For fuel gas, use the required approved leak-detection method and qualified personnel; never use a flame. For oxygen, keep the entire process compatible with the specified cleanliness requirements. Do not improvise a compressed-gas pressure test on equipment not designed for it.
For equipment applications, discuss ForeverSeal Industrial PTFE thread seal tape against the actual operating conditions.
9. Related Thread Sealing Guides
10. Get Application-Specific PTFE Tape Guidance
Share the thread standard, fitting material, size, fluid, temperature and pressure. ForeverSeal can discuss suitable tape specifications and current documentation for your evaluation. For water applications, also review water supply and drainage sealing solutions.
11. Frequently Asked Questions
How do you use PTFE tape on female threads?
Conventional thread seal tape is applied to suitable male pipe threads. Do not pack tape into the female connection; follow the fitting procedure.
Does PTFE tape need to dry?
Conventional PTFE tape does not rely on curing. Assembly and the required testing still need to be completed before service.
Is three wraps always enough?
No. The cited minimum is product-specific. Joint geometry, width, thickness, density, overlap and tension affect the result. Follow a confirmed procedure for the complete combination.
Should I choose tape width from pipe diameter alone?
No. Use nominal size as a starting reference, then check the usable thread length, bore clearance and fitting instructions. Small instrument connections may need tape narrower than the common 12 mm format.
Can I combine tape with a paste sealant?
Only where the product and component instructions permit the combination. Do not assume two sealants automatically improve performance.
Should I reuse old tape?
When reassembling a joint, remove old tape, inspect the components and apply fresh tape according to the approved procedure.